GLP-1 Medications
How to Inject Ozempic: Step-by-Step Guide for Beginners
A complete, beginner-friendly guide to injecting Ozempic — pen preparation, injection technique, site selection, dose timing, and how to build a consistent weekly routine.
On this page
- Before You Inject: Pen Preparation and Setup
- Check the Pen and Medication
- Gather Your Supplies
- Attach the Needle and Prime the Pen
- How to Inject Ozempic: Step-by-Step Pen Instructions
- Step 1: Choose and Clean Your Injection Site
- Step 2: Dial Your Dose
- Step 3: Insert the Needle and Inject
- Step 4: Remove and Dispose
- Choosing and Rotating Your Injection Sites
- Building a Weekly Routine That Sticks
- Pick Your Day and Time
- What to Do When You Miss a Dose
- Tracking Each Dose
- Managing Side Effects During Your First Weeks
- What to Expect
- When to Contact Your Prescriber
- Log Your Symptoms
- Understanding Your Ozempic Pen: Practical Details
- Pen Strengths and Dose Ranges
- Storage Rules
- Frequently Asked Questions
- Does injecting Ozempic hurt?
- What time of day should I inject Ozempic?
- Can I inject Ozempic in my arm?
- What should I do if I see blood after injecting?
Learning how to inject Ozempic is one of those things that sounds much harder than it actually is. I remember the first time I held a prefilled injection pen — the combination of unfamiliar medical hardware and the very real fact that I was about to stick a needle into my own body made the whole thing feel bigger than it needed to be. If that's where you are right now, you're in good company. Millions of people have been exactly here, and nearly all of them will tell you the same thing: the anticipation is worse than the injection itself.
This guide walks you through the entire process, from pen preparation to post-injection logging. Whether this is your first injection or you're a few weeks in and want to tighten your technique, this is the resource I wish I'd had on day one — practical knowledge to inject Ozempic confidently and build a weekly routine that sticks.
Before You Inject: Pen Preparation and Setup
Getting the pen ready correctly is half the battle. Most injection mistakes don't happen during the injection itself — they happen in the setup, when people skip steps because they're nervous or in a rush.
Check the Pen and Medication
Pull your Ozempic pen out of the refrigerator about 30 minutes before you plan to inject. A cold injection is more likely to sting, and letting the pen warm to room temperature makes the experience noticeably more comfortable. While it's warming up, check:
- Expiration date — never use an expired pen. The date is printed on the pen label and outer carton.
- Medication appearance — Ozempic should be clear and colorless. If it's cloudy, has particles, or is discolored, don't use it. Contact your pharmacy for a replacement.
- Pen label — confirm correct medication and strength. If you're managing multiple medications, this is a real mistake that happens.
Gather Your Supplies
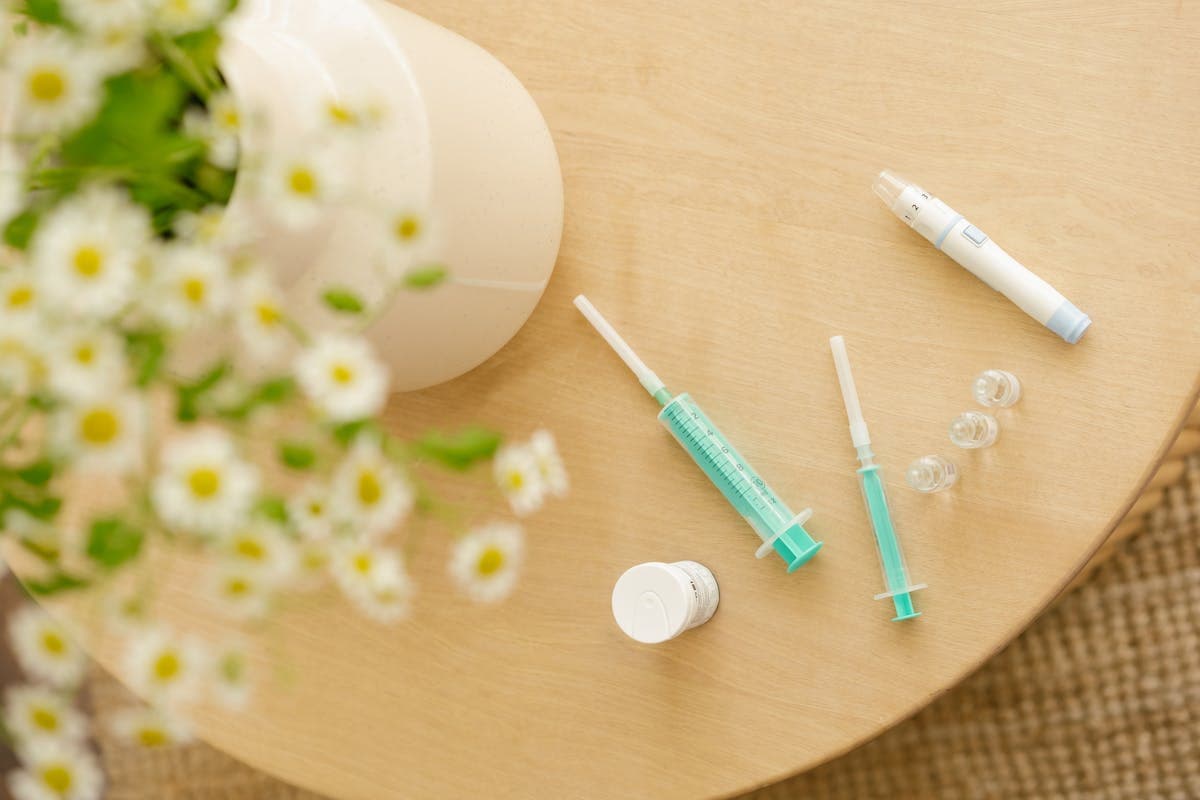
You'll need the Ozempic pen, a new pen needle (NovoFine or NovoTwist, typically 32-gauge), an alcohol swab, and a sharps container. Lay everything out on a clean surface so you won't be fumbling mid-injection.
Preparation is where confidence comes from. When you've checked the medication, gathered your supplies, and let the pen come to room temperature, the actual injection becomes the easiest part of the process. Rushing the setup is what makes people anxious.
Attach the Needle and Prime the Pen
Pull the paper tab off a new pen needle and screw it straight onto the pen tip. Remove the outer needle cap (save it — you'll need it to remove the needle later) and then the inner needle cap (discard this one). Now you need to prime the pen to make sure it's delivering medication and not air:
- Turn the dose selector to the flow check symbol (the two dots or dashes, depending on your pen model).
- Hold the pen with the needle pointing up.
- Press the dose button. A drop of medication should appear at the needle tip.
- If no drop appears, repeat up to six times. If you still don't see a drop after six attempts, the needle may be clogged — replace it with a new one and try again.
Priming matters. If air is trapped in the cartridge and you skip this step, you'll get an incomplete dose and won't know it until you notice the medication isn't working as expected.
How to Inject Ozempic: Step-by-Step Pen Instructions
This is genuinely straightforward once you've done it a couple of times. Here's each step with the practical context that makes the difference between textbook understanding and actually doing it well.
Step 1: Choose and Clean Your Injection Site
Ozempic is a subcutaneous injection, meaning it goes into the fatty tissue just below the skin — not into muscle. The three FDA-approved sites are:
- Abdomen — at least 2 inches from the belly button, avoiding the waistline. This is the most popular site for self-injection because the tissue is easy to access and pinch.
- Front of the thigh — the middle third, roughly a hand's width above the knee and below the hip crease.
- Upper arm — the back or outer area. This one is harder to do solo; many people save it for when a partner or caregiver can help.
For detailed guidance on where exactly to place each injection and how to move between sites week to week, our Ozempic injection sites guide covers every approved location with practical tips for each one.
Clean the area with an alcohol swab in a circular motion, moving outward. Let it air dry completely — injecting through wet alcohol stings.
Step 2: Dial Your Dose
Turn the dose selector until the counter shows your prescribed dose. During titration, most people start at 0.25 mg for the first four weeks. The counter clicks as you turn — confirming you've selected the right amount. If you dial past your dose, turn the selector back. No medication is wasted until you press the button.
Step 3: Insert the Needle and Inject
This is the moment. Here's how to make it smooth:
- Pinch a fold of skin at your chosen site. You want a soft mound of tissue — don't squeeze hard, just lift the skin away from the muscle beneath it.
- Insert the needle at a 90-degree angle straight into the pinched skin. One smooth, steady motion. Don't jab or hesitate halfway — a decisive insertion is actually less painful than a slow one.
- Press the dose button all the way in with your thumb and hold it there.
- Keep the needle in your skin for at least 6 seconds after the dose counter returns to zero. This is crucial — the medication needs time to flow out of the needle and into the tissue. Pulling out too early can result in a partial dose.
- Release the skin fold and withdraw the needle straight out.

The 6-second hold is the single most common step people skip, and it's one of the most important. Semaglutide is a relatively viscous medication. If you pull the needle out immediately after the counter hits zero, some of your dose may leak back out at the injection site. Count slowly to six — or better, to ten — every time.
Step 4: Remove and Dispose
Use the outer needle cap to unscrew and remove the needle — never recap with the inner cap, which risks a needlestick. Drop the used needle into your sharps container. Replace the pen cap and store per the instructions below.
Choosing and Rotating Your Injection Sites
Where you inject matters beyond the moment of the needle going in. Using the same spot every week leads to lipohypertrophy — hardened lumps of fatty tissue that change how your body absorbs medication, making doses less predictable.
The solution is systematic rotation. Even with a once-weekly injection, you should move between sites and areas within sites. A simple approach:
- Week 1: Left abdomen
- Week 2: Right thigh
- Week 3: Right abdomen
- Week 4: Left thigh
- Repeat the cycle
Within each region, move at least 1 inch from your last injection point. Our GLP-1 injection site rotation guide breaks this down further with a quadrant system and tracking methods that make rotation automatic.
Injection site rotation isn't a nice-to-have — it's a clinical requirement for any long-term injectable therapy. The tissue at your injection sites needs recovery time, and the consistency of your medication absorption depends on injecting into healthy tissue every time.

Building a Weekly Routine That Sticks
Most people master the mechanics within two or three doses. The harder challenge is long-term consistency: same day, every week, for months and years. The STEP 4 trial showed that people who stopped semaglutide regained about two-thirds of their lost weight. Consistency isn't a bonus; it's the mechanism.
Pick Your Day and Time
Ozempic can be injected any day, at any time. What matters is picking a day and time you'll commit to. Anchoring to a weekly ritual works better than relying on memory — Sunday evening after dinner, Wednesday morning before coffee, whatever fits your life. If you need to shift your injection day, ensure at least 2 days (48 hours) have passed since your last dose.
What to Do When You Miss a Dose
It happens. Travel, illness, a hectic week. Here's the guidance from the prescribing information:
- If your next scheduled dose is more than 2 days away: Take the missed dose as soon as you remember, then resume your regular schedule.
- If your next dose is 2 days or fewer away: Skip the missed dose and take your next one on schedule.
- Never double up. Two doses to "catch up" increases side effect risk without additional benefit.
Equally important: log the miss. When you track missed doses and their causes, patterns emerge — maybe you always miss during travel, or your injection day falls on your busiest day. Those patterns are fixable once visible. A missed-dose log template gives you a simple structure for this.
Tracking Each Dose
At minimum, log the date, time, dose, injection site and side, and any immediate notes (discomfort, bleeding, pen issues). This keeps you accountable and creates a record for prescriber check-ins. For a deeper framework, our guide on what to track when taking GLP-1 medications weekly lays out exactly which data points matter and which are noise.
The people who sustain results on Ozempic aren't the ones with perfect discipline — they're the ones with a system. A consistent day, a consistent site rotation pattern, and a consistent log. Systems survive the weeks when motivation doesn't.
Managing Side Effects During Your First Weeks
Your first few weeks on Ozempic — and the first week after each dose increase — are when side effects are most likely to appear. Knowing what's coming makes it much easier to push through the adjustment period rather than assuming something is wrong.
What to Expect
The most common side effects are gastrointestinal: nausea, constipation or diarrhea, and appetite reduction that can occasionally feel more intense than expected. In the STEP 1 clinical trial, roughly 44% of participants on semaglutide reported nausea, though the vast majority described it as mild to moderate and temporary.
Practical strategies that help during the adjustment period:
- Eat smaller meals. Semaglutide slows gastric emptying, so large meals amplify nausea.
- Stay hydrated. Dehydration makes nausea and constipation worse.
- Avoid high-fat or greasy foods in the first day or two post-dose.
- Don't inject on an empty stomach if nausea has been an issue — a light meal before injecting can help.
When to Contact Your Prescriber
Most GI symptoms improve as your body adjusts. But some signals warrant a call: severe or persistent vomiting, sharp abdominal pain that doesn't resolve, signs of an allergic reaction (swelling, difficulty breathing, rapid heartbeat), or symptoms that worsen instead of improving at a given dose level. Our semaglutide side effects guide covers everything from common nuisances to the rare events requiring prompt attention.
Log Your Symptoms
If you note what symptoms appeared, when in relation to your injection, severity (even on a 1-5 scale), and duration, you'll build a picture far more useful to your prescriber than "I felt nauseous sometimes." It takes 30 seconds per entry and turns vague check-ins into data-driven conversations.
Understanding Your Ozempic Pen: Practical Details
A few practical details worth knowing, especially if your prescriber didn't walk through every one.
Pen Strengths and Dose Ranges
Ozempic comes in three pen configurations:
| Pen Strength | Available Doses | Typical Use |
|---|---|---|
| 2 mg/1.5 mL | 0.25 mg or 0.5 mg | Starting dose and first escalation |
| 4 mg/3 mL | 1.0 mg | Standard maintenance for many patients |
| 8 mg/3 mL | 2.0 mg | Higher maintenance dose if needed |
Each pen contains multiple doses — the 2 mg pen delivers up to four 0.5 mg doses or eight 0.25 mg doses. Track remaining doses so you're never caught short on injection day.
Storage Rules
- Before first use: Refrigerate between 36-46°F (2-8°C). Do not freeze — a frozen pen must be discarded.
- After first use: Room temperature (below 86°F / 30°C) or refrigerator for up to 56 days. After 56 days, discard even if medication remains.
- Always remove the needle after each injection. Leaving a needle attached can cause air bubbles, contamination, or medication leakage.
For more about how semaglutide works at a higher level — the GLP-1 mechanism, the clinical trial evidence, and the full dosing titration schedule — our comprehensive semaglutide guide covers all of it in depth.
Frequently Asked Questions
Does injecting Ozempic hurt?
Most people describe it as a mild pinch that lasts about a second. The pen needles are 32-gauge and only 4-5mm long. Letting the pen reach room temperature helps, and so does relaxing the muscle at your injection site. Take a slow breath, relax, and insert in one smooth motion. Most people are surprised by how little they feel.
What time of day should I inject Ozempic?
There's no clinically mandated time. The best time is the time you'll consistently remember. Pair it with something you already do every week — that environmental cue makes adherence dramatically easier. If you need to shift your injection day, ensure at least 2 days have passed since your last dose.
Can I inject Ozempic in my arm?
Yes, the upper arm is an approved site, but it's the hardest to self-inject. If you have a partner or caregiver who can assist, the arm is a great addition to your rotation cycle. If you're solo, the abdomen and thigh give you plenty of rotation territory.
What should I do if I see blood after injecting?
A tiny drop of blood or a small bruise is normal — you nicked a capillary. Press gently with a clean cotton ball for 10-15 seconds. Don't rub. The medication was still delivered correctly. If you're seeing blood frequently or large bruises, you may be inserting at an angle or not pinching enough tissue.
Once you know how to inject Ozempic, the next challenge is doing it consistently, week after week, without dropping the ball. Done Dose was designed for exactly this kind of routine — one where consistent weekly timing, injection site rotation, and symptom tracking aren't just helpful, they're what determine whether the medication works long-term. With one-tap dose logging, automatic injection site rotation tracking, and smart reminders that adapt to your schedule, it turns the weekly Ozempic ritual from something you have to remember into something that practically runs itself. Start building your Ozempic routine with Done Dose.

